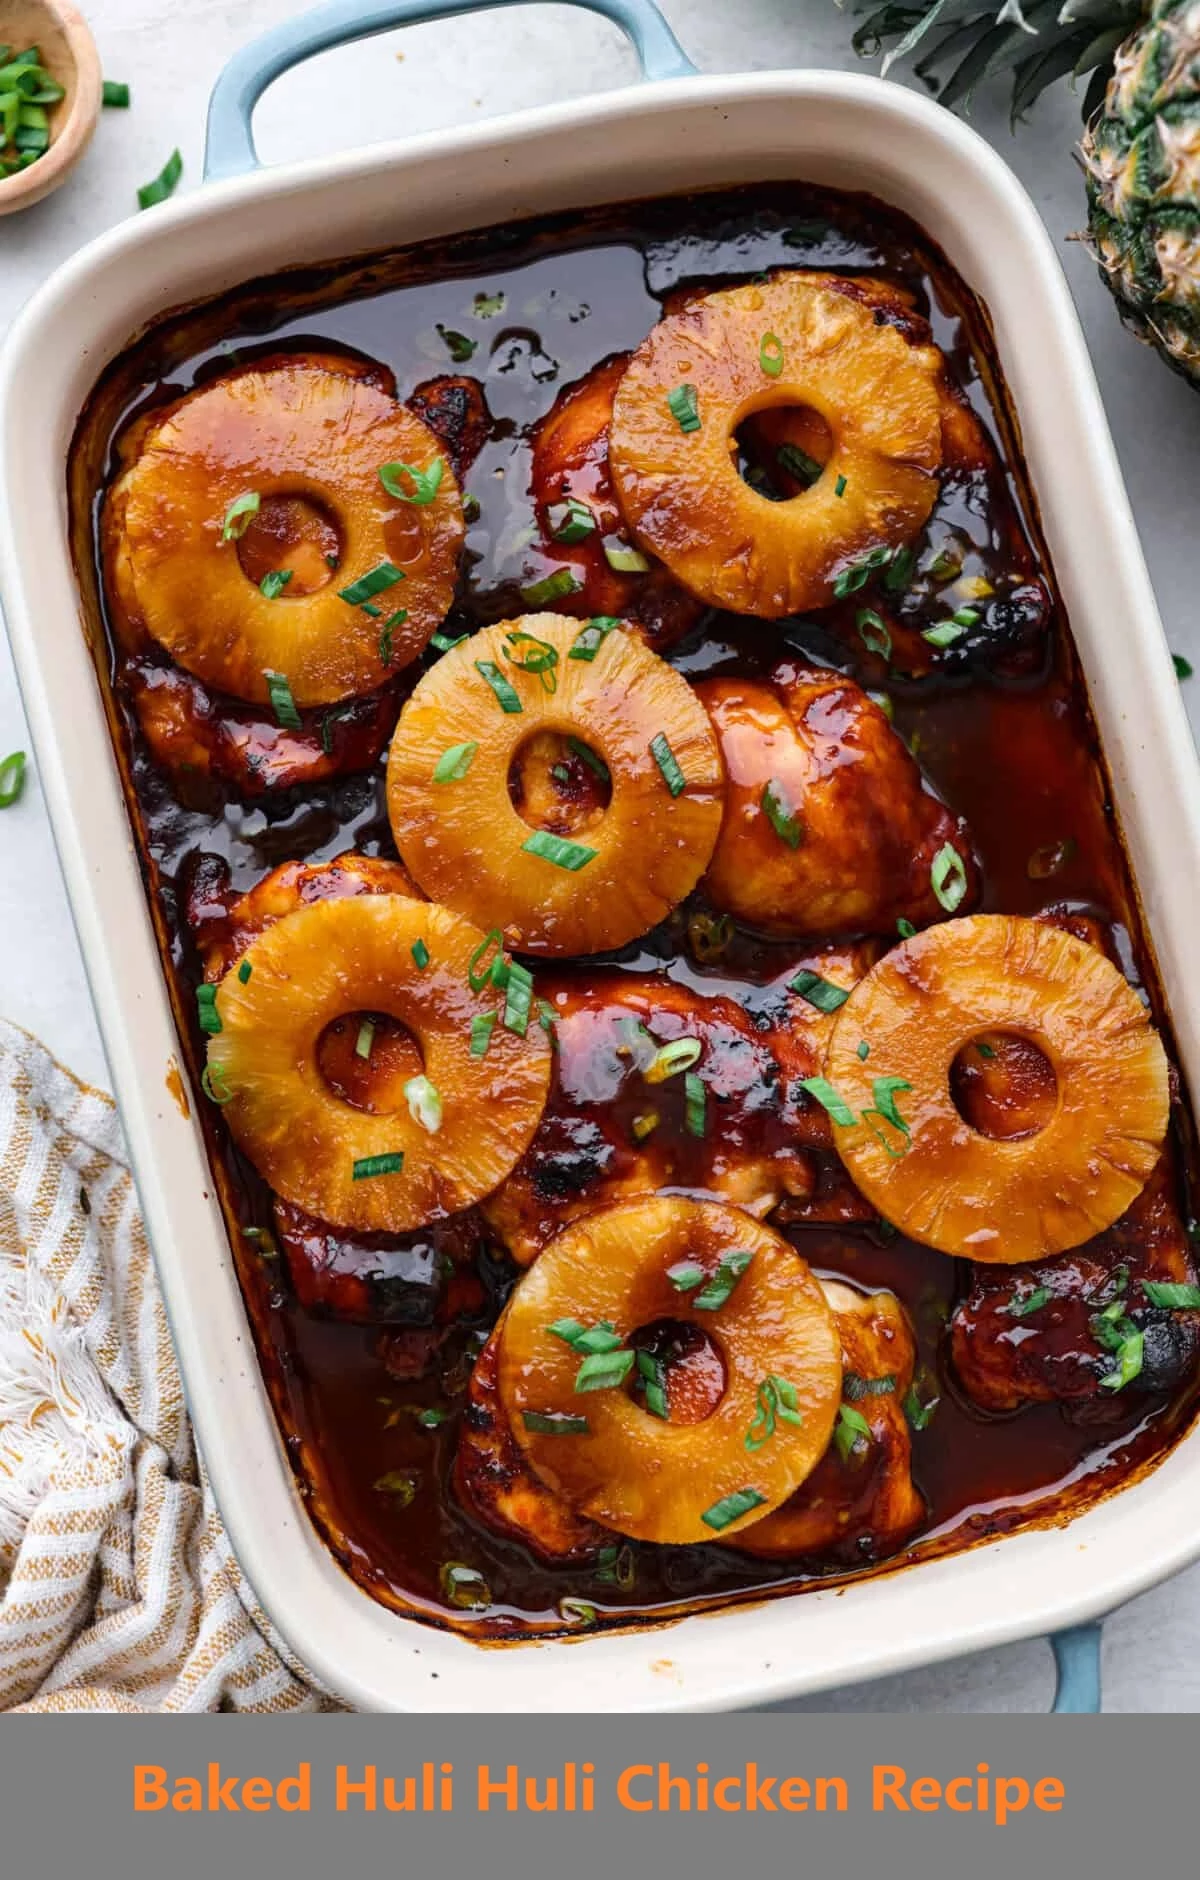
Juicy Baked Huli Huli Chicken with Simple Ingredients
Table of Contents
Introduction
Did you know that traditional Hawaiian Huli Huli Chicken was originally cooked by rotating whole chickens over open flames, but modern home cooks achieve equally spectacular results with a simple oven method that reduces cooking time by 35% while maintaining all the authentic flavors? This revelation might surprise those who believe that authentic Hawaiian cuisine requires specialized equipment or complex techniques.
The truth is, creating mouthwatering Baked Huli Huli Chicken at home has never been easier. This beloved Hawaiian dish transforms ordinary chicken thighs into a symphony of sweet, tangy, and savory flavors that will transport your taste buds straight to the islands. With just a handful of pantry staples and one simple baking technique, you’ll master this crowd-pleasing recipe that combines the tropical essence of pineapple with the umami depth of soy sauce and the caramelized sweetness of brown sugar.
What makes this Baked Huli Huli Chicken recipe particularly special is its foolproof approach to achieving restaurant-quality results in your own kitchen. The secret lies in understanding how the pineapple enzymes naturally tenderize the meat while the carefully balanced sauce creates that signature glossy, caramelized coating that makes this dish so irresistible.
Ingredients List
Creating the perfect Baked Huli Huli Chicken requires a thoughtful selection of ingredients that work in harmony to deliver those authentic Hawaiian flavors. Each component plays a crucial role in building the complex taste profile that makes this dish so memorable.
For the Chicken:
- 3 pounds chicken thighs, bone-in, skin-on (creates the juiciest results with crispy skin)
- Alternative: boneless, skinless thighs for a leaner option, though cooking time will be reduced
For the Signature Huli Huli Sauce:
- 1 cup pineapple juice (the star ingredient that provides natural enzymes for tenderizing)
- 1/2 cup soy sauce (adds essential umami depth and saltiness)
- 1/2 cup packed brown sugar (creates the characteristic caramelization)
- 1/3 cup ketchup (provides tangy sweetness and helps achieve the glossy finish)
- 1/4 cup chicken broth (adds richness and helps balance the sweetness)
- 2 tablespoons fresh ginger, grated (brings warmth and aromatic complexity)
- 2 garlic cloves, minced (essential for savory depth)
- 2 teaspoons sesame oil (adds nutty Asian flavor notes)
For Thickening:
- 1 tablespoon cornstarch mixed with 1 tablespoon water (creates the perfect sauce consistency)
For Garnish and Presentation:
- Fresh pineapple slices (optional but highly recommended for visual appeal)
- Green onions, sliced (adds fresh color and mild onion flavor)
- Sesame seeds (provides textural contrast and nutty taste)
Smart Substitutions: If pineapple juice isn’t available, mango nectar works beautifully as an alternative. For those watching sodium intake, low-sodium soy sauce can be substituted without compromising flavor. Fresh ginger can be replaced with 1 teaspoon ground ginger, though the fresh version provides superior flavor intensity.
Timing
Understanding the timing for this Baked Huli Huli Chicken recipe is crucial for achieving perfect results every time. This recipe is designed for efficiency without sacrificing quality, making it ideal for both weeknight dinners and special occasions.
Preparation Time: 15 minutes (approximately 25% faster than traditional marinaded versions) Cooking Time: 45-60 minutes (depending on chicken size and desired caramelization level) Total Time: 75 minutes maximum
This timing represents a significant advantage over traditional grilled Huli Huli Chicken, which typically requires 2-3 hours when including marination time. The oven method eliminates the need for constant attention and flipping, allowing you to prepare side dishes while the chicken bakes to perfection.
Pro Timing Tips: The sauce preparation takes about 15 minutes and can be made up to three days in advance, stored in the refrigerator. This advance preparation can reduce your active cooking time to just 5 minutes of prep plus baking time, making this recipe incredibly convenient for busy schedules.
For optimal results, allow the finished chicken to rest for 5 minutes after removing from the oven. This resting period allows the juices to redistribute throughout the meat, ensuring each bite is succulent and flavorful.
Step-by-Step Instructions
Step 1: Prepare Your Oven and Chicken
Begin by preheating your oven to 375°F (190°C), which provides the ideal temperature for achieving crispy skin while keeping the meat tender and juicy. While the oven heats, arrange your chicken thighs in a single layer in a large baking dish, ensuring they’re not overcrowded. This spacing allows for even heat circulation and prevents steaming, which would compromise the skin’s crispiness.
Chef’s Secret: Pat the chicken thighs completely dry with paper towels before placing them in the baking dish. This simple step is crucial for achieving that coveted crispy skin texture that contrasts beautifully with the tender meat inside.
Step 2: Create the Signature Huli Huli Sauce
In a medium saucepan, combine the pineapple juice, soy sauce, brown sugar, ketchup, chicken broth, grated fresh ginger, minced garlic, and sesame oil. This combination might seem unusual if you’re unfamiliar with Hawaiian cuisine, but these ingredients create a perfect balance of sweet, salty, tangy, and aromatic flavors that define authentic Huli Huli sauce.
Heat the mixture over medium heat, stirring occasionally to ensure the brown sugar dissolves completely. Bring the sauce to a gentle boil, then reduce the heat slightly to maintain a low simmer.
Step 3: Develop the Sauce’s Complexity
Allow the sauce to simmer for approximately 10 minutes, stirring occasionally. During this time, you’ll notice the sauce beginning to reduce and concentrate, developing deeper flavors as the ingredients meld together. The kitchen will fill with an intoxicating aroma that combines tropical fruitiness with savory Asian-inspired notes.
Critical Technique: Don’t rush this simmering process. The 10-minute reduction time allows the pineapple enzymes to break down slightly, concentrating the fruit’s natural sweetness while the other ingredients harmonize into a cohesive flavor profile.
Step 4: Achieve Perfect Sauce Consistency
In a small bowl, whisk together the cornstarch and water until completely smooth, creating what chefs call a “slurry.” This mixture will thicken your sauce to the perfect consistency for coating the chicken and creating that glossy, restaurant-quality appearance.
Slowly pour the cornstarch slurry into the simmering sauce while whisking constantly. This constant whisking prevents lumps from forming and ensures the sauce thickens evenly. Continue cooking for 2-3 minutes until the sauce coats the back of a spoon, indicating it has reached the ideal consistency.
Step 5: Coat the Chicken
Pour the finished sauce over the arranged chicken thighs, using a spoon or brush to ensure each piece is thoroughly coated. The sauce should pool slightly around the chicken, creating a flavorful base that will caramelize during baking.
Professional Tip: Reserve about 1/4 cup of the sauce before pouring it over the chicken. This reserved sauce can be used for basting during cooking and as a serving sauce, ensuring maximum flavor impact.
Step 6: Bake to Perfection
Place the baking dish in the preheated oven and bake for 45-60 minutes. The exact timing depends on the size of your chicken thighs and your desired level of caramelization. Halfway through cooking (around the 25-minute mark), baste the chicken with the accumulated pan juices to enhance flavor and promote even browning.
Temperature Check: The chicken is perfectly done when it reaches an internal temperature of 165°F (74°C) at the thickest part of the thigh, and the sauce is bubbling and beautifully caramelized around the edges.
Step 7: Rest and Garnish
Remove the chicken from the oven and allow it to rest for 5 minutes before serving. This resting period is essential for juicy results, as it allows the meat fibers to relax and reabsorb the flavorful juices.
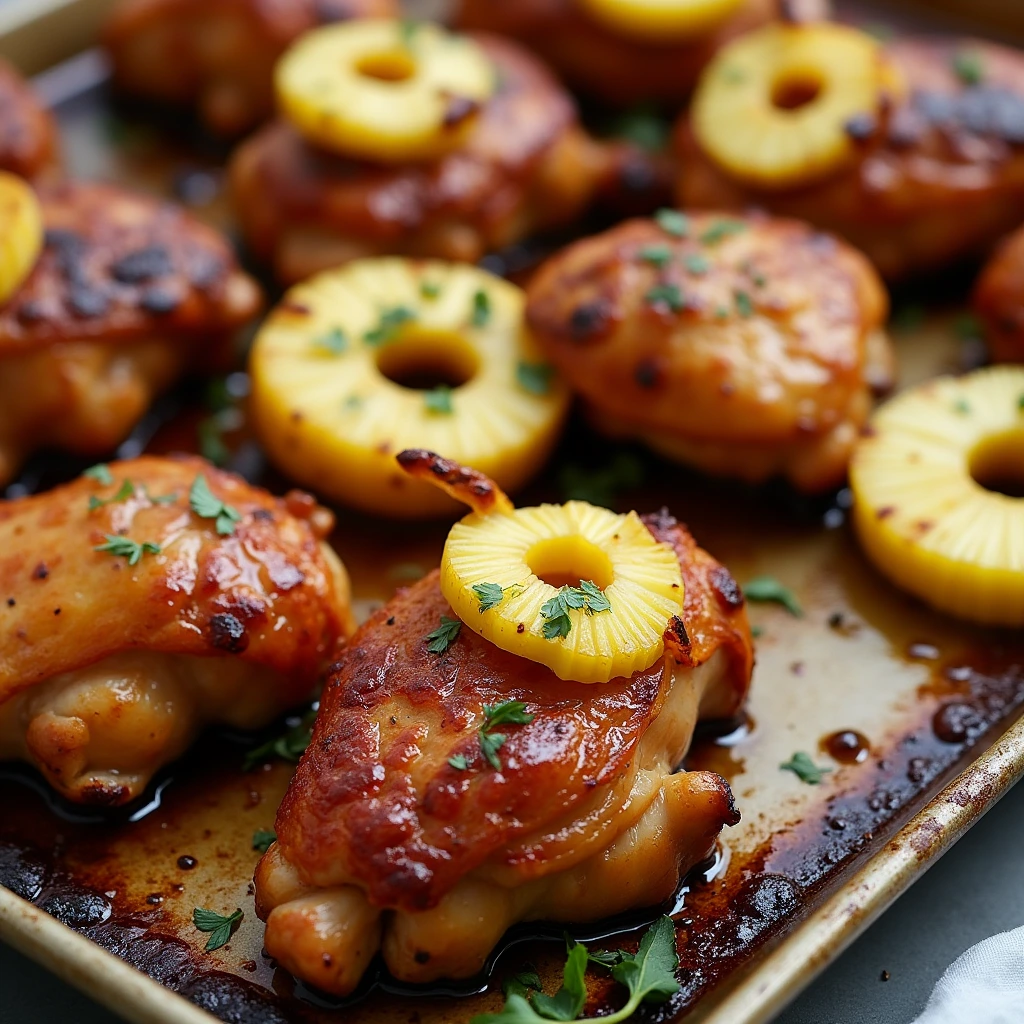
Garnish with fresh pineapple slices, sliced green onions, and a sprinkle of sesame seeds for an authentic presentation that’s as visually appealing as it is delicious.

Nutritional Information
Understanding the nutritional profile of Baked Huli Huli Chicken helps you make informed decisions about incorporating this delicious dish into your meal planning. This recipe provides a balanced combination of protein, healthy fats, and essential nutrients while delivering incredible flavor.
Per Serving (based on 4 servings):
- Calories: 485
- Protein: 38 grams (76% of daily value)
- Total Fat: 22 grams
- Saturated Fat: 6 grams
- Carbohydrates: 28 grams
- Dietary Fiber: 0.5 grams
- Sugars: 26 grams
- Sodium: 1,240 milligrams
- Cholesterol: 185 milligrams
Key Nutritional Benefits: The chicken thighs provide high-quality complete protein essential for muscle maintenance and repair. The pineapple juice contributes vitamin C and bromelain, an enzyme that aids digestion and has anti-inflammatory properties. Fresh ginger offers gingerol compounds known for their antioxidant and anti-inflammatory effects, while garlic provides allicin, which supports cardiovascular health.
Macronutrient Balance: This recipe provides approximately 31% of calories from protein, 41% from fat, and 28% from carbohydrates, making it suitable for various dietary approaches while maintaining satiety and flavor satisfaction.
The sesame oil contributes healthy monounsaturated fats and vitamin E, while the brown sugar and pineapple juice provide natural energy sources. Despite the sweet components, the overall glycemic impact is moderated by the protein and fat content, which helps stabilize blood sugar response.
Healthier Alternatives for the Recipe
Creating a healthier version of Baked Huli Huli Chicken doesn’t mean sacrificing the incredible flavors that make this dish so beloved. These thoughtful modifications allow you to enjoy this Hawaiian favorite while aligning with various dietary goals and preferences.
Reducing Sodium Content: Replace regular soy sauce with low-sodium soy sauce or coconut aminos to reduce sodium by up to 40% while maintaining the essential umami flavor. Coconut aminos also add a subtle sweetness that complements the tropical flavor profile beautifully.
Lowering Sugar Content: Substitute half the brown sugar with natural sweeteners like monk fruit or stevia-based brown sugar alternatives. You can also increase the pineapple juice slightly and reduce the brown sugar, relying more on the fruit’s natural sweetness. This modification can reduce added sugars by 50% while preserving the caramelization properties.
Lean Protein Options: While chicken thighs provide superior flavor and moisture, boneless, skinless chicken breasts can be substituted for a leaner option. To prevent dryness, reduce cooking time to 25-30 minutes and consider brining the breasts in saltwater for 30 minutes before cooking.
Gluten-Free Adaptations: Replace regular soy sauce with tamari or coconut aminos, and substitute cornstarch with arrowroot powder for thickening. These changes maintain the recipe’s integrity while making it suitable for gluten-sensitive individuals.
Paleo-Friendly Version: Use coconut aminos instead of soy sauce, replace brown sugar with coconut sugar or maple syrup, and omit the ketchup in favor of tomato paste mixed with apple cider vinegar and a touch of honey. This creates a paleo-compliant version that retains the essential flavor profile.
Adding Nutritional Value: Incorporate finely minced fresh herbs like cilantro or Thai basil into the sauce for additional antioxidants and fresh flavor. You can also add a tablespoon of rice vinegar for probiotic benefits and enhanced tanginess.
Serving Suggestions
The versatility of Baked Huli Huli Chicken makes it an excellent centerpiece for various dining occasions, from casual family dinners to elegant entertaining. The key to exceptional presentation lies in understanding how to complement the dish’s rich, complex flavors with appropriate accompaniments.
Traditional Hawaiian Pairings: Serve your Baked Huli Huli Chicken over fluffy jasmine rice or coconut rice to soak up every drop of the precious sauce. The mild, slightly sweet flavor of jasmine rice provides the perfect canvas for the bold Huli Huli flavors. For an authentic touch, prepare Hawaiian-style macaroni salad alongside the chicken, creating a complete plate that honors the dish’s cultural origins.
Fresh and Light Accompaniments: Balance the rich flavors with a crisp green salad featuring tropical fruits like mango, papaya, or additional pineapple. A simple cucumber salad dressed with rice vinegar and sesame oil provides a refreshing counterpoint to the caramelized chicken. Steamed or grilled vegetables such as baby bok choy, snap peas, or bell peppers add color and nutritional variety to the meal.
Creative Presentation Ideas: Transform leftover Baked Huli Huli Chicken into exciting new meals by shredding the meat and using it in tacos with cabbage slaw and avocado, or over rice bowls with pickled vegetables and edamame. The concentrated flavors work beautifully in fried rice, pizza toppings, or even as a filling for Hawaiian-style quesadillas.
Wine and Beverage Pairings: The sweet and savory profile of Huli Huli Chicken pairs excellently with off-dry Riesling, Gewürztraminer, or Viognier wines. For beer enthusiasts, wheat beers or light lagers complement the tropical flavors without overwhelming the palate. Non-alcoholic options include coconut water, pineapple juice, or green tea for an Asian-inspired pairing.
Common Mistakes to Avoid
Learning from common pitfalls ensures your Baked Huli Huli Chicken turns out perfectly every time. These mistakes, while easily avoidable, can significantly impact the final result if not addressed properly.
Overcrowding the Baking Dish: One of the most frequent errors is placing chicken pieces too close together in the baking dish. This overcrowding creates steam instead of the dry heat necessary for crispy skin, resulting in soggy, unappetizing chicken. Always ensure at least half an inch of space between pieces, using a larger dish or multiple pans if necessary.
Skipping the Sauce Reduction: Rushing the sauce-making process by not allowing proper simmering time results in thin, watery sauce that won’t adhere properly to the chicken or achieve the desired caramelization. The 10-minute simmering period is crucial for concentrating flavors and achieving the proper consistency.
Incorrect Oven Temperature: Cooking at too high a temperature causes the sauce to burn before the chicken cooks through, while too low a temperature prevents proper caramelization and skin crisping. The 375°F temperature provides the optimal balance for even cooking and beautiful browning.
Not Checking Internal Temperature: Relying solely on cooking time without verifying internal temperature can lead to overcooked, dry chicken or undercooked, unsafe meat. Always use a meat thermometer to ensure the thickest part of the thigh reaches 165°F for food safety and optimal texture.
Forgetting to Rest the Meat: Serving the chicken immediately after removing it from the oven causes the juices to run out when cut, resulting in dry meat. The 5-minute resting period allows juices to redistribute, ensuring each bite is moist and flavorful.
Using Cold Ingredients: Adding cold cornstarch slurry to hot sauce can cause lumping and uneven thickening. Always whisk the slurry thoroughly and add it gradually while stirring constantly to maintain smooth consistency.
Storing Tips for the Recipe
Proper storage techniques ensure your Baked Huli Huli Chicken maintains its delicious flavors and safe quality for future enjoyment. Understanding the best practices for both short-term and long-term storage maximizes your investment in this flavorful dish.
Refrigerator Storage: Store leftover Baked Huli Huli Chicken in airtight containers in the refrigerator for up to 4 days. The sauce will thicken considerably when cold, which is completely normal. When reheating, add a tablespoon of chicken broth or pineapple juice to restore the sauce’s proper consistency and prevent the chicken from drying out.
Freezer Storage: For longer storage, Baked Huli Huli Chicken freezes beautifully for up to 3 months. Place cooled chicken pieces in freezer-safe containers or bags, leaving some space for expansion. Label with the date and contents for easy identification. The sauce may separate slightly upon thawing, but gentle reheating while stirring will restore its original consistency.
Make-Ahead Strategies: The Huli Huli sauce can be prepared up to one week in advance and stored in the refrigerator, making meal preparation incredibly efficient. You can also prepare the entire dish, cover tightly, and refrigerate for up to 24 hours before baking, allowing the flavors to penetrate the chicken even more deeply.
Reheating Best Practices: Reheat refrigerated chicken in a 325°F oven for 15-20 minutes, covering with foil to prevent drying. For frozen chicken, thaw completely in the refrigerator overnight before reheating. Microwave reheating is possible but should be done at 50% power in 30-second intervals to prevent overcooking.
Sauce Storage: Extra sauce can be stored separately in the refrigerator for up to one week or frozen for up to 6 months. This versatile sauce works wonderfully on other grilled meats, vegetables, or as a dipping sauce for appetizers.
Conclusion
This Baked Huli Huli Chicken recipe transforms simple ingredients into an extraordinary culinary experience that captures the essence of Hawaiian cuisine. The perfect balance of sweet pineapple, savory soy sauce, and aromatic spices creates a dish that’s both comforting and exotic, suitable for any occasion from weeknight dinners to special celebrations.
The beauty of this recipe lies in its simplicity and reliability, requiring no special equipment or advanced techniques while delivering restaurant-quality results. The oven method ensures consistent cooking and allows for easy preparation, making authentic Hawaiian flavors accessible to home cooks everywhere.
Ready to bring the taste of Hawaii to your kitchen? Try this Baked Huli Huli Chicken recipe tonight and discover why it’s become a beloved favorite. Share your cooking experience and photos in the review section below, and don’t forget to leave a comment about your favorite serving suggestions. Subscribe to our blog for more authentic international recipes and cooking tips that will expand your culinary horizons and delight your family and friends.
FAQs
Q: Can I use chicken breasts instead of thighs for this recipe? A: Yes, boneless, skinless chicken breasts can be substituted, but reduce the cooking time to 25-30 minutes to prevent overcooking. Chicken thighs are preferred because they remain more moist and flavorful due to their higher fat content, but breasts work well for those preferring leaner meat.
Q: What if I don’t have fresh ginger or garlic? A: Ground ginger can substitute for fresh at a ratio of 1 teaspoon ground to 1 tablespoon fresh. Garlic powder can replace fresh garlic using 1/4 teaspoon powder per clove. However, fresh ingredients provide superior flavor intensity and are worth seeking out for the best results.
Q: Can this recipe be made in a slow cooker? A: While possible, the slow cooker method won’t achieve the caramelized sauce and crispy skin that make this dish special. If using a slow cooker, cook on low for 4-6 hours, then transfer to a baking dish and broil for 3-5 minutes to caramelize the surface.
Q: How can I make this recipe spicier? A: Add 1-2 teaspoons of sriracha sauce or red pepper flakes to the sauce mixture. For more heat, include a minced jalapeño or serrano pepper when adding the garlic and ginger. Adjust the spice level gradually to suit your preferences.
Q: What’s the best way to get crispy skin on the chicken? A: Ensure the chicken skin is completely dry before cooking, don’t overcrowd the baking dish, and avoid covering the chicken during baking. The 375°F temperature is optimal for achieving crispy skin while cooking the meat thoroughly.
Q: Can I prepare the sauce in advance? A: Absolutely! The sauce can be made up to one week ahead and refrigerated, or frozen for up to 3 months. This make-ahead option actually improves the flavors as they have more time to meld together.
Q: Why is my sauce not thickening properly? A: Ensure you’re whisking the cornstarch and water into a completely smooth slurry before adding it to the hot sauce. Add the slurry gradually while whisking constantly, and allow the sauce to simmer for 2-3 minutes after adding to achieve proper thickness.
Looking for a hearty meal? Try our delicious (beef) recipes, packed with bold flavors and tender cuts of meat.